Turn by turn navigation on the eTrex
TL;DR
This can be done for free if you plan/draw your routes on plotaroute. The other options I list will require a paid subscription to either plotaroute or Ride with GPS
- Step 1: Create a GPX track
- Tracks created with Komoot, Alltrails, or Ride with GPS go to step 2
- Tracks created with plotaroute or go to step 3
- Step 2: Add turn-by-turn directions to your track
- Using Ride with GPS:
- Import the track, the cue sheet will be empty
- Trace the track, either manually or automatically. If you use the automatic trace function, check if your track didn’t get moved.
- Using plotaroute (Note: I did not try this so use at your own risk)
- Import the track into plotaroute using the “Snap to Map” feature (paid premium feature)
- Using Ride with GPS:
- Step 3: Export track with turn-by-turn notifications
- Using Ride with GPS: Export as GPX Track (.gpx) and check the box “Include cues as waypoints”
- Using plotaroute: Export as GPX Track, waypoints as directions
- Step 4: Import into Garmin Basecamp and add proximity alarms to all waypoints
- If you skip this step, you can still see distance to next in Trip Computer or the data fields on the map
- Step 5: What are you waiting for? Go ride your bike!
Nomenclature
In the Garmin world, there are three ways of getting yourself from point A to B (or Z if you’re into doing ultras)
Tracks: This is a breadcrumb trail. Tracks will show as a line on the display of your eTrex, and you have to pay attention to follow it. The eTrex will not notify you if you stray off the track, nor will it direct you back to it. The length of a track is limited to 10’000 points.
Routes: This will show as line on the display of your eTrex, and it will notify you when a turn is coming up (beep and message). The length of the route is limited to 200 points however, after which the line and notifications will abruptly end.
Courses: Combine above mentioned worlds (think of it as a love baby between tracks and routes), however, do not work on an eTrex and therefore are not an option.
I have never reached the limit of 10’000 points for a track, however, the limit of 200 points for a route left me stranded in the middle of nowhere once. Since I do not feel like splitting up my (quite long) cycling routes into hundreds of smaller ones (seriously, who has time for that?), I do not consider this a valid option for me. Enter the in-between solution: tracks with turn-by-turn notifications
Step 1
First off, you will need a track (GPX). Either use one you have lying around or log into your favorite website (e.g., Komoot or Alltrails) and plan to your hearts’ content. There’s tons of sites and YouTube videos on how to do this, so I will leave the details into your capable hands. If you created your track from plotaroute or Ride with GPS skip step 2 and go to step 3
Frugal tip: plotaroute will plan your route in such a way that it follows cycle paths and roads where cycling is allowed. You can draw out your routes in big chunks, and then afterwards adjust the route using the “Reshape Route” tool in the left-hand side menu by adding and moving anchors.
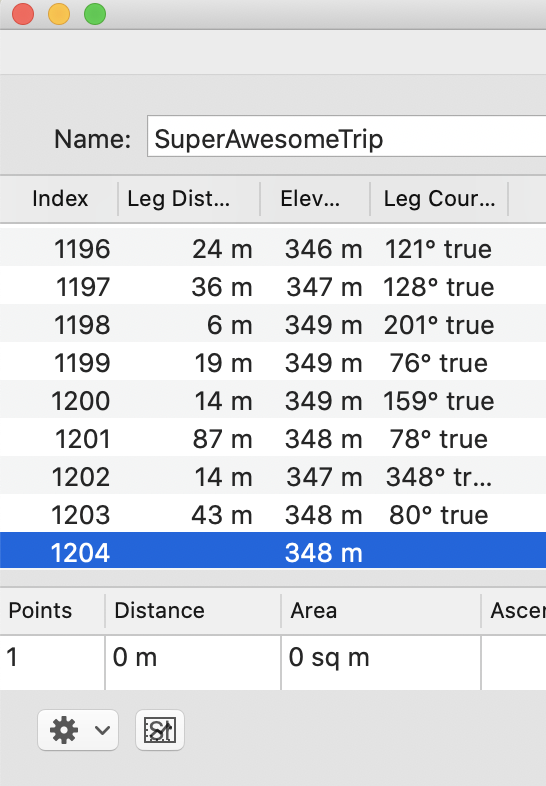
Pro tip: if you are planning a long-distance tour and are worried about the 10’000 point mark: load your track in Garmin Basecamp, right-click it and pick “Get Info”. This will open up a new window with details on your track. If you scroll all the way down, you can see how many points there are in your track
Here you can see there are 1204 points, way below the 10’000 mark
Step 2
At this point you will have a GPX track. If you load this onto your eTrex, you will not get turn-by-turn notifications. The eTrex will simply show you a line which you will have to follow. If you stray off-course, you will not be redirected back towards your track. In order to get turn-by-turn notifications, you will have to add waypoints at every turn with proximity alarms. This might be fine if your trip is short, but it tends to get out of hand on longer trips. Luckily, there are a couple of options to automatically add these.
Option 2.1: Ride with GPS
You will have to pay for a subscription to use these features.
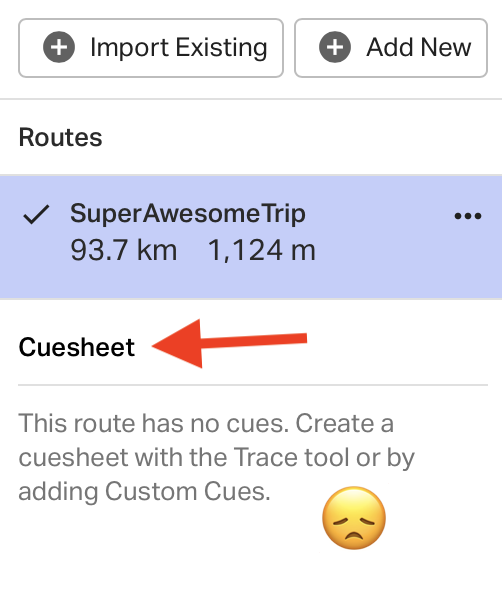
Log into your account, go to the route planner and import your GPX
If you look at the cue sheet on your left-hand side, you will notice the absolute and total lack of cues
No cues no fun!
Luckily, this can be fixed. You can decide to either manually create a couple of cues on sections that are difficult to navigate, or have the website auto-trace your entire route and automatically add cues everywhere.
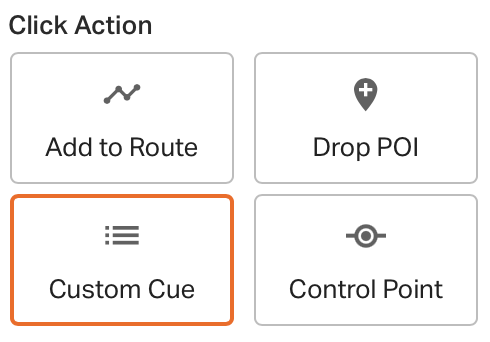
If you want to manually add only a couple of cues (for example control points during an audax or a couple of stores along the route): On the right-hand of the site, under “Click Action” click on “Custom Cue”
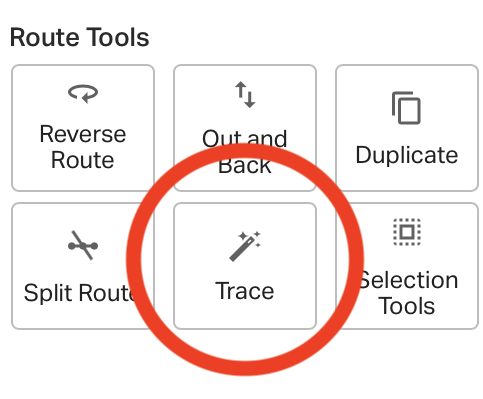
If you want to automatically trace your entire route: On the right-hand side of the site, under “Route Tools” click on “Trace”
You will be asked if you want to auto-trace or manually trace your track. Manually will take longer, but you can make sure your track is followed 100%. If you choose auto-trace, you can check the automatic trace afterwards and, if needed, readjust the route. For longer routes I recommend the auto-trace option. Depending on the length of your track, the website will take a while to auto-trace your track. After it’s done, you will see cues lined up in the cuesheet on your left-hand side.
Option 2.2: plotaroute
You will have to pay for a subscription to use these features. Caveat 1: If you plan/draw your route using plotaroute, you can download the track with turn-by-turn for free and you can skip this step. Caveat 2: I did not try this method, so consider this experimental and at your own risk
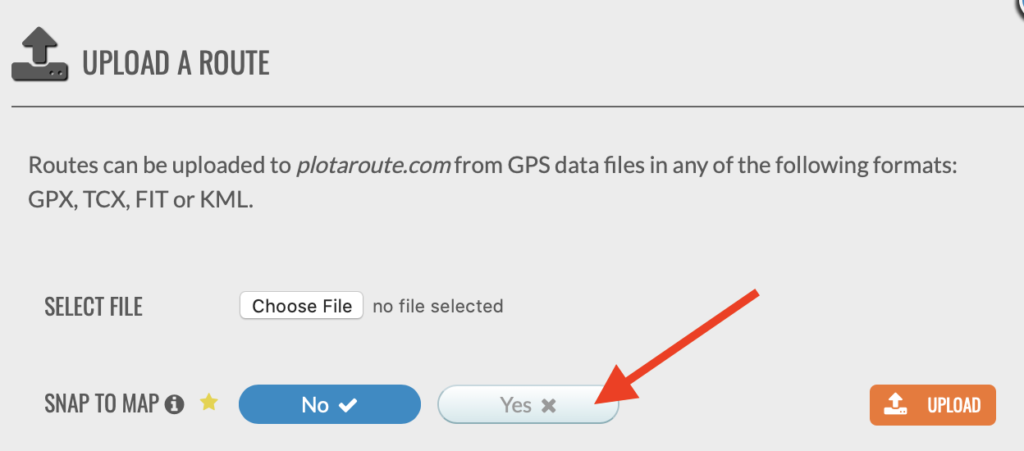
Log into your account, click “Create” (top left) and then “Upload a Route”
In the pop-up box, select your GPX and then click “Yes” on “Snap to Map” (paid premium feature)
Step 3
At this point you will have a track with turn-by-turn directions either in plotaroute or in Ride with GPS. All that’s left is to export it.
Option 3.1: Export from Ride with GPS
Export your track as a GPX, using the “Include cues as waypoints”
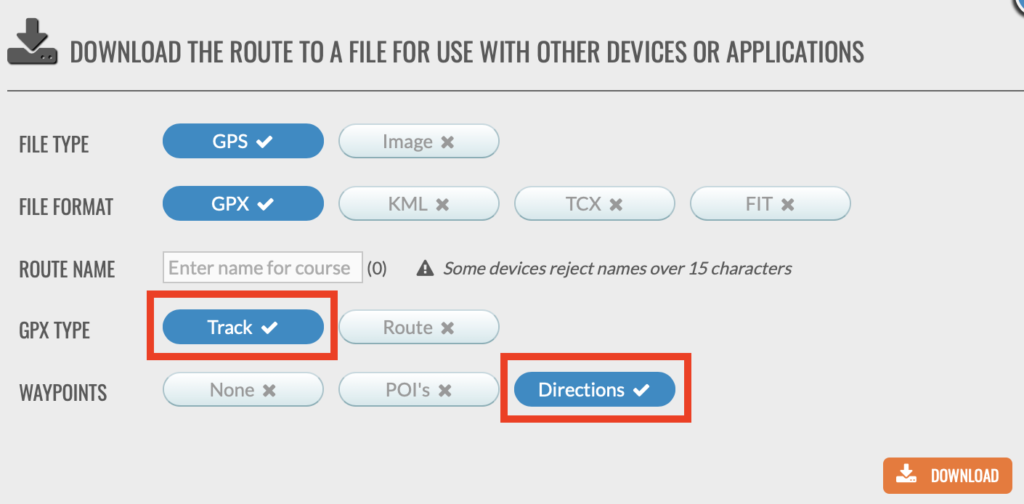
Option 3.2: Export from Plotaroute
- Right-lower corner, choose “D’LOAD”
- Note that if you have a long route, a message will pop up that routes are limited to 200 points. You can ignore this, since we’re not going to export it as a route, but as a track with waypoints as cues, so the rule of max 10’000 points applies
- In the options menu export using the following options:
Step 4
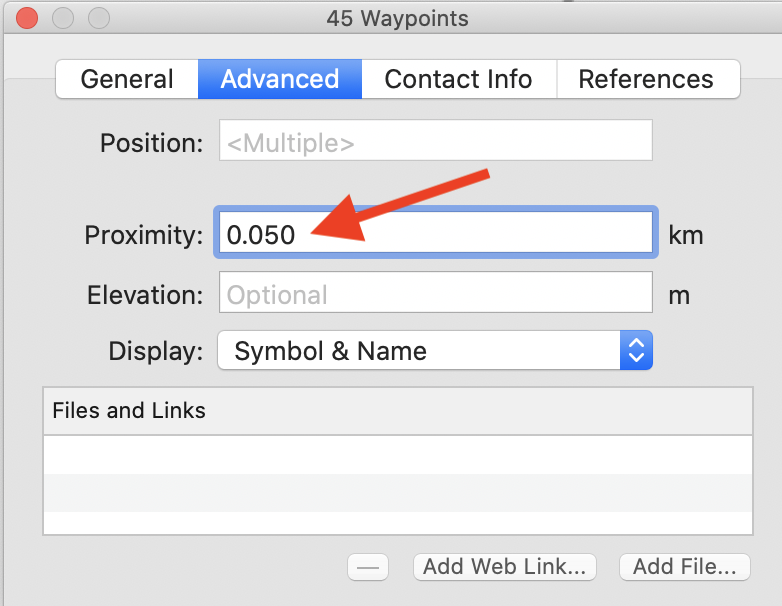
Almost done. You now have a downloaded track with waypoints which can be used as turn-by-turn directions. In order for your eTrex to warn you, you will have to add proximity alarms. I’m using Garmin Basecamp to do this.
- Import your track into Garmin Basecamp
- In the left-lower panel you will see your track and a LOT of waypoints
- Select all the waypoints, right-click and pick “Get Info”
- Under the “Advanced” tab, add proximity alerts (in my example: ever 50 meters)
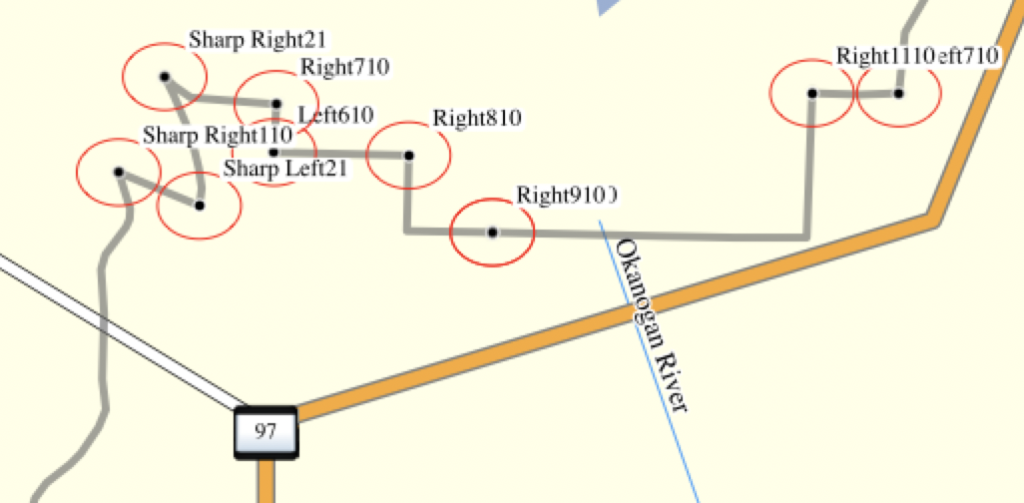
When done correctly, you will see little circles around waypoints. The circles denote the perimeter where your eTrex will alert you.
All that’s left now is to synchronize it to your eTrex and enjoy!
A couple of notes
Putting proximity alerts on your track will make a message pop up on the screen of your eTrex (e.g. “approaching turn left” and “leaving turn left”). This message will disappear after a couple of seconds, but during this time you will not be able to view the map. If you have a lot of sequential turns (for example if you are navigating a city), these pop-ups will make navigating sequential turns that are close to one-another very challenging. I’m still in the process of figuring out how to disable these. (Update 04/2024: still didn’t find a solution)
A nice middle-ground could be enabling “distance to next” either as a tile in the map view or in the trip computer. This way you will see how far the next turn is. In order to see distance to the next turn on the map (this can be a bit hidden)
- Open the map on your eTrex
- Press the menu button
- Choose “setup map”
- Make sure that the data fields are enabled (for example, 2 small)
- Press the back button to go back to the map again
- Press menu and then pick “change data fields”
- Pick “Distance to next”
If you want to see the distance to the next turn in your trip computer, go to the trip computer, press menu, and pick “change data fields”.
Final step…
Send your route art to your Garmin. Plug it in, navigate to the Garmin map on your eTrex and copy/paste it there. Alternatively, you can store your maps on a SD card, which also makes it easy to transfer between devices. Depending on the size of your map, transferring it to an eTrex or a SD card might take quite some time. Enjoy your new map!
One more thing
There’s no affiliate links here. I do not have financial ties to any of the sites, services and/or devices mentioned on this website. I do not make money on anything mentioned in my articles.
I’m not responsible if you take a wrong turn, get lost, get into an accident or ruin your GPS in any way. As always, navigating traffic means you need to pay attention to the road, not your GPS. I’d pick a wrong turn over being hit by a car any day, and you should as well. Wear a helmet. Stay safe and keep the rubber side down!
Updates
Update 02/2024: Updated cue export in Ride with GPS